> ## Documentation Index
> Fetch the complete documentation index at: https://developer.suki.ai/llms.txt
> Use this file to discover all available pages before exploring further.

# Documentation MCP Integration

> Connect Suki developer documentation as an MCP server in your AI code editor to search guides, API reference, and SDK docs while you integrate

<div className="quick-summary-wrapper">
  <div className="quick-summary-header">
    <span className="quick-summary-icon" aria-hidden="true" />

    <span className="quick-summary-title">Quick summary</span>
  </div>

  <div className="quick-summary-content">
    Connect <code>[https://developer.suki.ai/mcp](https://developer.suki.ai/mcp)</code> to Cursor, VS Code, Claude, Claude Code, Codex, or similar tools. Agents can search the docs, read pages from a virtual filesystem, and submit documentation feedback. The server does not call Suki product APIs on your behalf.
  </div>

  <div className="quick-summary-footer">
    <span className="quick-summary-footer-icon" aria-hidden="true" />

    <span className="quick-summary-footer-text">Last updated:</span>
    <span className="quick-summary-footer-date">August 2026</span>
  </div>
</div>

The Suki developer documentation is available as a hosted **search MCP server** (Model Context Protocol). Connect it to your AI code editor or assistant (**Cursor**, **VS Code**, **Claude**, **Claude Code**, **Codex**, and similar tools) while you work in your local environment.

When the connection is active, the model can search published guides, API reference, and SDK docs during a response, instead of relying only on training data or a generic web search.

For the contextual menu, copy options, and one-click AI integrations on every page, use [AI-optimized documentation](/documentation/references/ai-optimized-documentation).

When you connect Documentation MCP well, it helps you to:

* Find integration answers in the current published docs.
* Pull full page Markdown into the chat when a snippet is not enough for an answer.
* Discover agent skills that Suki developer documentation exposes as MCP resources, without a separate install step for discovery.
* Report incorrect or confusing docs back to the Suki docs team from the agent.

**What this server does not do**

* It does not execute any product APIs on your behalf.
* It does not replace Partner Token or Suki Token authentication for those APIs.

## Key benefits
<CardGroup cols={2}>
  <Card title="Accelerate Your Development" icon="rocket">
    Use the documentation as an MCP service in your AI code editor to assist coding and integration tasks.
  </Card>

  <Card title="Improve Your LLM's Responses" icon="brain">
    Retrieve information from the documentation in your AI code editor to improve response accuracy.
  </Card>

  <Card title="Reduce Manual Research" icon="book">
    Reduce the need for manual research and documentation lookup.
  </Card>

  <Card title="Reduce LLM Hallucinations" icon="triangle-exclamation">
    Ground responses in current documentation instead of invented endpoints or SDK patterns.
  </Card>
</CardGroup>

## MCP server URL

Use the following URL as the custom connector endpoint:

```
https://developer.suki.ai/mcp
```

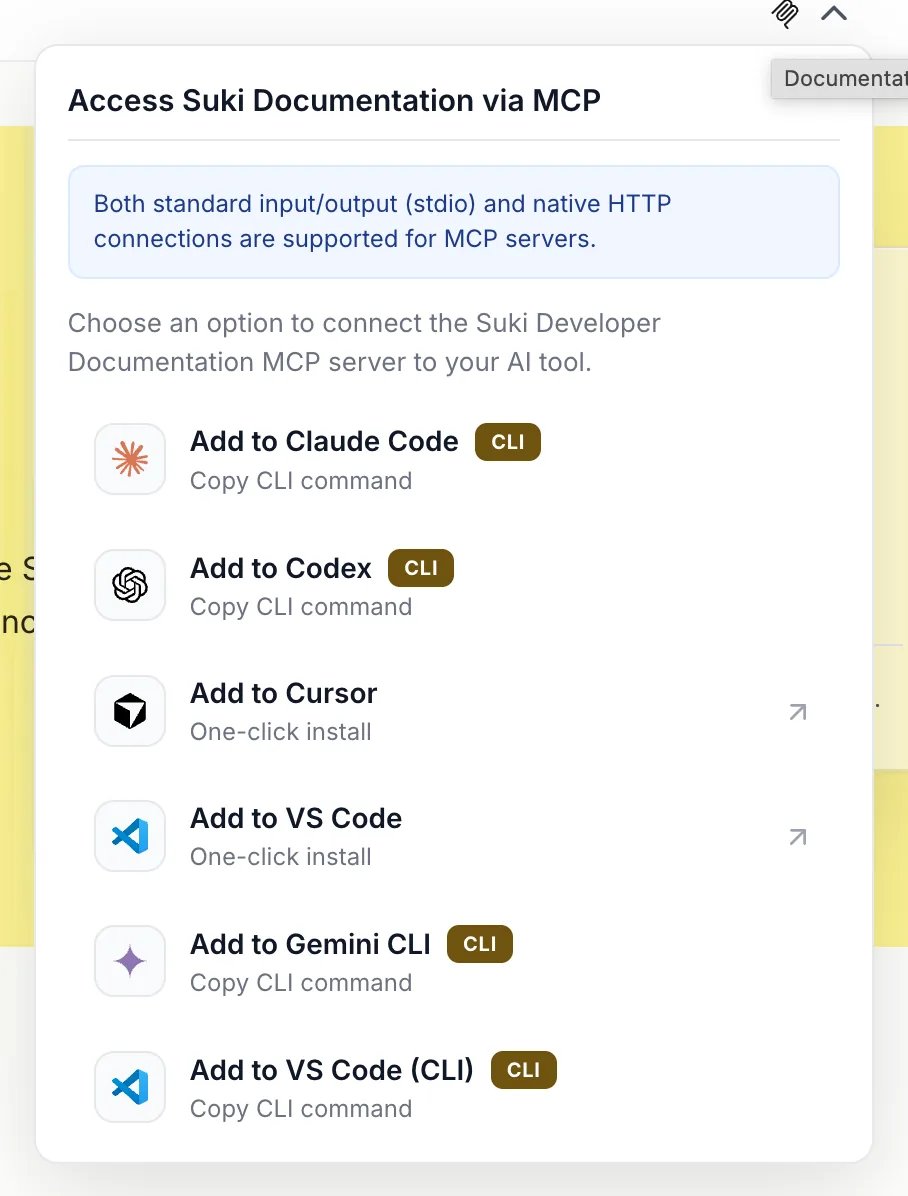
You can copy this URL from the **Documentation MCP** dropdown in the top navigation bar, from **Copy MCP server URL** in the contextual menu on any page, or from the configuration snippets below.

Agents and tools can also discover the server from `https://developer.suki.ai/.well-known/mcp` (and `/.well-known/mcp.json`). Prefer the public URL above when you configure a client by hand.

The screenshot below shows the **Documentation MCP** dropdown in the top navigation bar:

<div style={{ maxWidth: '36rem', marginLeft: 'auto', marginRight: 'auto' }}>
  <img src="https://mintcdn.com/suki-1e08f176/HLkoX7rrX4o_l5h7/documentation/assets/mcp-doc.webp?fit=max&auto=format&n=HLkoX7rrX4o_l5h7&q=85&s=6a812328fab0aee12a7209f7b71a2fd1" alt="Documentation MCP dropdown in the top navigation bar with install and copy actions for Cursor, VS Code, CLI tools, and MCP URL" width={908} height={1196} style={{ width: '100%', height: 'auto', display: 'block', borderRadius: '10px', border: "1px solid #e0e0e0" }} loading="eager" decoding="async" data-path="documentation/assets/mcp-doc.webp" />
</div>

The panel lists one-click install actions for Cursor and VS Code, plus copy actions for CLI tools (Claude Code, Codex, Gemini CLI, and others). CLI options show a **CLI** badge. Use **Copy MCP URL** for tools that need the endpoint only.

## How the MCP server works

When an AI application connects to the Suki documentation MCP server, it can search indexed site content and retrieve full pages as Markdown while it answers your prompt. That keeps answers aligned with what is published on `developer.suki.ai`.

* AI applications can search proactively while generating a response, even if you did not ask them to search.
* They choose which tool to call from conversation context and relevance to Suki docs.
* Each tool call runs during generation, so the model can use up-to-date documentation.

<Tip>
  Some AI tools support both MCP and skills. MCP gives access to your content. Skills instruct agents how to use that content. Connecting this MCP server also exposes published skill resources for discovery. For product prompts and skill URLs, refer to [AI coding tools](/documentation/references/ai-coding-tools).
</Tip>

## MCP server tools

When you connect the Suki developer documentation MCP server, agents can use three tools:

1. **Search**: Searches across the site and returns snippets with titles and links. Use this to discover information or find pages that match a query.
2. **Query docs filesystem**: Reads and navigates a virtual documentation filesystem with shell-style commands (`rg`, `head`, `cat`, `tree`, and similar). Use this to browse structure, pull exact sections, or read one or more full pages in a single call.
3. **Submit feedback**: Reports a documentation issue when a page is incorrect, outdated, confusing, or incomplete. The agent supplies the page path and a description. Mintlify records that as unhelpful feedback for the docs team.

Agents decide when to use each tool. A typical flow is search first, then query docs filesystem for the best matches. If the agent finds a problem in the page, it can submit feedback.

<Note>
  The documentation MCP server is **read-only** for content retrieval, plus optional feedback. It does not call Suki product APIs, mutate your integration, or access private partner data.
</Note>

### MCP resources

The search MCP server also exposes published `skill.md` files as MCP resources. Connected agents can discover and read those skill descriptions without installing skills separately. For install commands and product skills, see [AI-optimized documentation](/documentation/references/ai-optimized-documentation) and [AI coding tools](/documentation/references/ai-coding-tools).

### Search parameters

The search tool supports optional parameters that AI applications may apply when your site has matching filters:

| Parameter  | When it applies                                                                            |
| :--------- | :----------------------------------------------------------------------------------------- |
| `version`  | Filter to a documentation version (for example `v0.7`) when the site has multiple versions |
| `language` | Filter to a language code (for example `en`) when the site has multiple languages          |

<Note>
  Suki developer documentation is primarily a **single public English site**. Your AI tool decides whether to pass these filters based on the conversation.
</Note>

## How to set up MCP integration

**Setup tabs (agents):** MCP URL is `https://developer.suki.ai/mcp` for all clients.

* **Cursor:** Command palette → Open MCP settings → Add custom MCP; `mcpServers.suki-docs.url` = `https://developer.suki.ai/mcp`.
* **VS Code:** `.vscode/mcp.json` with HTTP server `suki-docs` → `https://developer.suki.ai/mcp`.
* **Claude:** Connectors → Add custom connector named Suki Developer Documentation MCP server.
* **Claude Code:** `claude mcp add --transport http "Suki Developer Documentation MCP server" https://developer.suki.ai/mcp`.
* **Codex:** `~/.codex/config.toml` with `[mcp_servers.suki-docs]` and `url = "https://developer.suki.ai/mcp"`, or `codex mcp add --url https://developer.suki.ai/mcp suki-docs`.

<Tabs>
  <Tab title="Cursor">
    <Steps>
      <Step title="Open MCP Settings in Cursor" icon="gear">
        1. Use **Command + Shift + P** on Mac or **Ctrl + Shift + P** on Windows to open the command palette.
        2. Search for **Open MCP settings** and select **Add custom MCP**. This opens `mcp.json`.
        3. Add the following configuration:

        ```json theme={"theme":{"light":"github-dark","dark":"material-theme-darker"}}
        {
          "mcpServers": {
            "suki-docs": {
              "url": "https://developer.suki.ai/mcp"
            }
          }
        }
        ```

        Or select **Connect to Cursor** from the contextual menu on any documentation page, or use **Install in Cursor** from the **Documentation MCP** dropdown.
      </Step>
    </Steps>
  </Tab>

  <Tab title="VS Code">
    <Steps>
      <Step title="Configure the MCP Server in VS Code" icon="gear">
        1. Create a `.vscode/mcp.json` file in your project root.
        2. Add the following configuration:

        ```json theme={"theme":{"light":"github-dark","dark":"material-theme-darker"}}
        {
          "servers": {
            "suki-docs": {
              "type": "http",
              "url": "https://developer.suki.ai/mcp"
            }
          }
        }
        ```

        Or use **Install in VS Code** from the **Documentation MCP** dropdown.
      </Step>
    </Steps>
  </Tab>

  <Tab title="Claude">
    <Steps>
      <Step title="Add a Custom Connector in Claude" icon="gear">
        1. Open the [Connectors](https://claude.ai/settings/connectors) page in Claude settings.
        2. Select **Add custom connector**.
        3. Set the name to **Suki Developer Documentation MCP server** and the URL to `https://developer.suki.ai/mcp`.
        4. Select **Add**.
        5. When using Claude, select the attachments button (plus icon) and choose **Suki Developer Documentation MCP server**.
      </Step>
    </Steps>
  </Tab>

  <Tab title="Claude Code">
    <Steps>
      <Step title="Install the MCP Server with Claude Code CLI" icon="terminal">
        Run the following command:

        ```bash theme={"theme":{"light":"github-dark","dark":"material-theme-darker"}}
        claude mcp add --transport http "Suki Developer Documentation MCP server" https://developer.suki.ai/mcp
        ```

        Confirm with `claude mcp list`.
      </Step>
    </Steps>
  </Tab>

  <Tab title="Codex">
    <Steps>
      <Step title="Add the MCP Server in Codex" icon="terminal">
        In `~/.codex/config.toml`, add:

        ```toml theme={"theme":{"light":"github-dark","dark":"material-theme-darker"}}
        [mcp_servers.suki-docs]
        url = "https://developer.suki.ai/mcp"
        ```

        Or copy the Codex CLI command from the **Documentation MCP** dropdown (`codex mcp add --url …`).
      </Step>
    </Steps>
  </Tab>
</Tabs>

<Tip>
  Use the **Documentation MCP** dropdown in the top navigation bar to copy these snippets without retyping URLs or JSON.
</Tip>

## Test your connection

After configuration, ask your AI tool:

```
What MCP tools do you have available?
```

You should see Suki documentation tools for search, query docs filesystem, and submit feedback. Then try:

```
Search the Suki documentation for ambient session webhooks
```

The AI should search and return relevant documentation pages. If it needs full page text, it can use query docs filesystem on the matching paths.

## Using multiple MCP servers

You can connect several MCP servers in one AI tool. Connected servers do not inject content until the model calls a search or read tool.

Best practices:

* Connect only the MCP servers relevant to your current work.
* Be specific in prompts so the model searches the most relevant server.
* Disconnect servers you are not using to reduce context usage.

## Troubleshooting

<AccordionGroup>
  <Accordion icon="plug" title="MCP Server Not Connecting">
    Verify the URL is exactly `https://developer.suki.ai/mcp`. Check your internet connection and restart your AI tool after configuration.
  </Accordion>

  <Accordion icon="search" title="Search or Filesystem Tools Not Available">
    Confirm the MCP server was added correctly. Try removing and re-adding the server configuration. Check your AI tool's MCP support documentation. Tool names can be site-specific; ask the model which tools it has after connect.
  </Accordion>

  <Accordion icon="file-lines" title="Search Returns No Results">
    Try different or more general search terms (for example, "webhook" instead of "session completion webhook payload"). Verify the MCP connection is active. Hidden or `noindex` pages are not available through search MCP.
  </Accordion>

  <Accordion icon="gauge" title="Rate Limit Errors">
    If the MCP server returns HTTP `429 Too Many Requests`, wait and retry. Mintlify applies per-user and per-site hourly limits on search and filesystem tools. Most clients recover automatically within an hour.
  </Accordion>
</AccordionGroup>

## Additional context for AI tools

Use these URLs when an AI tool needs broader context than a single page:

| Resource            | URL                                                                                                     | Use when                                                                                                  |
| :------------------ | :------------------------------------------------------------------------------------------------------ | :-------------------------------------------------------------------------------------------------------- |
| AI coding tools     | [AI coding tools](/documentation/references/ai-coding-tools)                                            | You want copy-ready prompts for Ambient, Form filling, Dictation, Patient Summary, streaming, or webhooks |
| Agent skills index  | [`/.well-known/agent-skills/index.json`](https://developer.suki.ai/.well-known/agent-skills/index.json) | The agent should discover every published skill                                                           |
| Documentation index | [`llms.txt`](https://developer.suki.ai/llms.txt)                                                        | You need a list of all documentation pages with titles and descriptions                                   |
| Full documentation  | [`llms-full.txt`](https://developer.suki.ai/llms-full.txt)                                              | Your question spans multiple products (APIs, SDKs, webhooks, Form filling, and more)                      |
| Platform skill      | [`suki-platform`](https://developer.suki.ai/.well-known/agent-skills/suki-platform/SKILL.md)            | The integration path is still unclear                                                                     |
| MCP discovery       | [`/.well-known/mcp`](https://developer.suki.ai/.well-known/mcp)                                         | An agent or tool should locate the search MCP server without prior configuration                          |

### Install skills from the MCP server

Use the following command to install every published skill that Suki developer documentation exposes as MCP resources:

```bash theme={"theme":{"light":"github-dark","dark":"material-theme-darker"}}
npx skills add https://developer.suki.ai
```

You can also install the skill for a specific product from that product’s **workflow** or **modality** index hub. On hubs such as Ambient Clinical Notes, Form filling, Dictation, Patient Summary, Audio Streaming, Webhooks, and the SDK or API overview pages, an **Install Skill** control appears next to the page title. Open it to copy or run `npx skills add` for the skill that matches that hub.

The screenshot below shows **Install Skill** on the Patient Summary index hub, including the skill version on the control:

<div style={{ maxWidth: '36rem', marginLeft: 'auto', marginRight: 'auto' }}>
  <img src="https://mintcdn.com/suki-1e08f176/M0iqwE5pp57WcfnJ/documentation/assets/install-skill-hub.webp?fit=max&auto=format&n=M0iqwE5pp57WcfnJ&q=85&s=8866a4e32810901401863967ee72e832" alt="Patient Summary index hub with Install Skill control showing New v2.4 next to the page title" width={720} height={130} style={{ width: '100%', height: 'auto', display: 'block', borderRadius: '10px', border: "1px solid #e0e0e0" }} loading="eager" decoding="async" data-path="documentation/assets/install-skill-hub.webp" />
</div>

The control shows the published skill **version** (for example `v2.4`). When the hub marks the skill as **New** or **Updated**, reinstall that skill so your editor gets the latest copy. Run the command from **Install Skill** again, or reconnect the documentation MCP server and ask your agent to install or refresh the latest skills.

## Next steps

<Icon icon="file-lines" iconType="solid" /> **[AI-optimized documentation](/documentation/references/ai-optimized-documentation)** - Contextual menu and copy options on every page.

<Icon icon="file-lines" iconType="solid" /> **[AI coding tools](/documentation/references/ai-coding-tools)** - Product prompts and skill URLs.

<Icon icon="file-lines" iconType="solid" /> **[Quickstart](/documentation/get-started/quick-start)** - Getting-started path, including AI coding prompts.
